Hello, guys today here in this post I will tell you How you can make a Remote Control Home Automation System at home.
This is a most useful electronics project in home and industrial locations. Through this project, you can control your Electric home appliances through the remote.
In this project, you can also call remote control smart switch. To make this project you have to follow just four steps, which I explain in the below block step by step. I will provide you all the components list and code which is needed to make this project much easier. Just follow the below instruction.
Required Materials to make Remote control Home Automation System
Table of Contents
| SL NO | Material name | Buying Link |
|---|---|---|
| 1 | Relay Module | BUY |
| 2 | Arduino UNO | BUY |
| 3 | IR Receiver | BUY |
| 4 | Jumper Wire | BUY |
| 5 | AC Appliances (Bulb, Fan, Fridge, TV) | BUY |
| 6 | Remote (Any) | BUY |
Connection to make Remote control Home Automation System

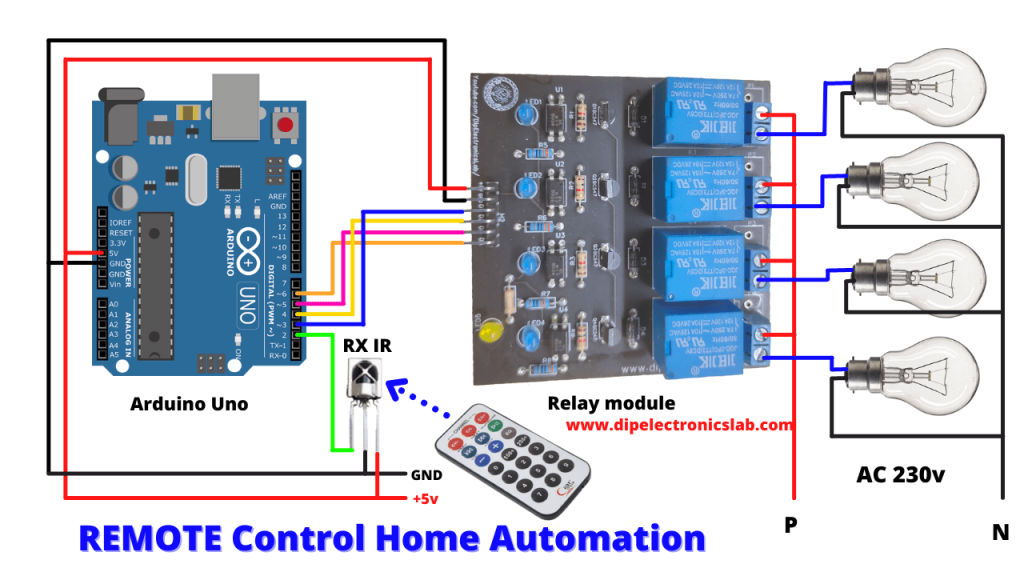
To complete all the connections of Remote control Smart Switch follow the above diagram. You can download this diagram to complete your project without any errors.
Arduino CODE For Remote control Home Automation System
There are have two-part to making this project. One is Remote decoding and another is the main code to control the relay module.
I have already written an article on How to Decode any remote. So learn the Remote decoding process read that article and decode your remote.
After decoding the remote upload the below code on your Arduino. Before upload, the below code make sure to change the remote decoding code in the code.
//Follow us youtube.com/DipElectronicsLab
//Our Official Site www.dipelectronicslab.com


#include <IRremote.h>

int RECV_PIN = 2;
IRrecv irrecv(RECV_PIN);
decode_results results;

#define BUTTON_1 0x1FE50AF
#define BUTTON_2 0x1FED827
#define BUTTON_3 0x1FEF807
#define BUTTON_4 0x1FE30CF
#define BUTTON_5 0x1FEB04F
#define BUTTON_6 0x1FE708F
#define BUTTON_7 0x1FE00FF
#define BUTTON_8 0x1FEF00F
#define BUTTON_9 0x1FE9867
#define BUTTON_10 0x1FEE01F
#define BUTTON_11 0xF78877
#define BUTTON_12 0xF7A85 7
#define BUTTON_13 0x1FE48B7
#define BUTTON_14 0x1FE7887


int LED1 = 3;
int LED2 = 4;
int LED3 = 5;
int LED4 = 6;
int LED5 = 7;
int LED6 = 8;


void setup()
{
  pinMode(LED1, OUTPUT);
  pinMode(LED2, OUTPUT);
  pinMode(LED3, OUTPUT);
  pinMode(LED4, OUTPUT);
  pinMode(LED5, OUTPUT);
  pinMode(LED6, OUTPUT);

  irrecv.enableIRIn();
}
void loop() {

  if (irrecv.decode(&results))
  {
    if (results.value == BUTTON_13)
    {
      digitalWrite(LED1, HIGH);
      digitalWrite(LED2, HIGH);
      digitalWrite(LED3, HIGH);
      digitalWrite(LED4, HIGH);
      digitalWrite(LED5, HIGH);
      digitalWrite(LED6, HIGH);
    }
    if (results.value == BUTTON_14)
    {
      digitalWrite(LED1, LOW);
      digitalWrite(LED2, LOW);
      digitalWrite(LED3, LOW);
      digitalWrite(LED4, LOW);
      digitalWrite(LED5, LOW);
      digitalWrite(LED6, LOW);
    }
    if (results.value == BUTTON_1)
    {
      digitalWrite(LED1, HIGH);
    }
    if (results.value == BUTTON_2)
    {
      digitalWrite(LED2, HIGH);
    }
    if (results.value == BUTTON_3)
    {
      digitalWrite(LED3, HIGH);
    }
     if (results.value == BUTTON_4)
    {
      digitalWrite(LED4, HIGH);
    }
     if (results.value == BUTTON_5)
    {
      digitalWrite(LED5, HIGH);
    }
     if (results.value == BUTTON_6)
    {
      digitalWrite(LED6, HIGH);
    }
    if (results.value == BUTTON_7)
    {
      digitalWrite(LED1, LOW);
    }
    if (results.value == BUTTON_8)
    {
      digitalWrite(LED2, LOW);
    }
    if (results.value == BUTTON_9)
    {
      digitalWrite(LED3, LOW);
    }
     if (results.value == BUTTON_10)
    {
      digitalWrite(LED4, LOW);
    }
     if (results.value == BUTTON_11)
    {
      digitalWrite(LED5, LOW);
    }
     if (results.value == BUTTON_12)
    {
      digitalWrite(LED6, LOW);
    }
    irrecv.resume();
  }
}
Download

Now our project is ready to test. I have attached a practical video to make this remote control home automation system below this block. Watch that video to understand the easy way.
NOTE: If you have any questions and queries regarding this project and facing any issue with making this project, just comment down below I will reply to you as soon as possible with your answer.
Video of Remote Control Smart Swith making
See Others Electronics Project
- How to Make Relay Module Circuit and PCB
- How to make AtMega AtTiny IC Programmer at Home
- How To Make Remote Hex Code Encoder
- How to Make Relay Module with Optocoupler
- How to make Pixel LED Controller Circuit
- LCD LED Repairing guide Ebook
- How to make ATtiny Shield
- How to Upload Code on Any Attiny IC
- What is Bootloader in Electronics
- Best Android TV Box in India
- LCD LED Repairing Practical Video
FAQ of Remote Control Smart Swith making
Advance Home Automation System
Yes, this is an advanced home automation system, where you can control any electric home appliance with any remote. If you want to make this advanced home automation project read this post and you will get all the important files to make this project.
how to Control AC TV Fridge Fan Bulb through Remote?
To Control AC TV Fridge Fan Bulb through Remote you have to make an advanced home automation system. Here in this post, I have explained how to make an advanced Remote control home automation system at home. To make this project by yourself read this article.
Advance Home Automation Electric System
Yes, this is an Advance Home Automation Electric System. By using this system you can control all you electrical application through the remote. If you want to make this project just read this article and many by yourself.


